 How to Optimize Your Wireless Network Channel
When you use a wireless network at home, range and performance can be influenced by a lot of factors. The location of your wireless router as well as the location of your PC and/or laptop can make a lot of difference. Concrete walls have a strong influence on WiFi signals so too many concrete walls in between the communication devices will reduce the signal strength, and as a result the performance.
But range and obstacles are not the only possible problems with wireless networks. What about your neighbors? If they are using a wireless network, chances are, you are both using the same frequency, which would cause interference and again loss of signal quality. Since wireless internet access is so common these days, it’s better to check that too.
Here’s How You Can Improve Your Wi-Fi Network!
Depending on the location of your equipment, you can try to change the direction of your antennas. If your router has a built-in antenna, consider hanging it on a wall instead of placing it horizontally on a cabinet to change antenna direction. Most routers will come with instructions on best positioning for maximum range.
If you want to further optimize the range and performance of your wireless network, you might need to change the frequency of your WiFi communication. There is a dedicated bandwidth for WiFi networks, in which multiple channels are defined. The problem is that many vendors configure their hardware to use a default channel. Typically this is channel 6, since it is the middle of the range (1 to 11 in the US, up to 13 for Europe).
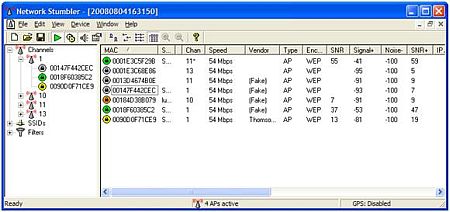
To find out if you need to change your wireless network frequency, you need to know what channel you are using and if the other channels are better. There are many tools available for this, and one of them is called NetStumbler. The current version is 0.4.
The program can be installed with the default options. Once you start the application, it will automatically start a scan of the wireless networks in your surroundings.

In the results, you can see all detected networks grouped by MAC address, SSID or channel. The colored icon in front of the MAC address indicates the signal strength. Using these details, you can first check how many networks are using the same channel as you are. You will need to know your SSID of course (either printed at the bottom of your wireless router, if it came from your ISP, or check the network settings on your computer’s wireless card). Ideally, there should not be (too) many wireless networks on the same channel, but if there are, you want to make sure they have low signal strength.
If there are too many wireless networks on the same channel, try changing the channel to improve your wireless network range and performance. This needs to be done in the wireless router or access point. The hardware will come with instructions on how to change the WiFi channel. Your laptop or PC’s wireless card will automatically switch to the new channel.
If you are using a laptop, you can also use the program to see where your signal strength is best. Move around with the laptop and see which location in your house has the best signal strength. You can use the colored icon as well as the “signal” columns to assess the network quality. Make sure the network scanning is active to ensure the values are updated while you move around.
Vista Support
Version 0.4 of NetStumbler unfortunately does not support Windows versions beyond XP. A new version is being developed that is expected to add Vista support as well as Windows 7.
For Windows Vista and Windows 7 there are other programs that can be used alternatively.
As suggested in the comments, inSSIDer is one possibility, and WirelessNetView is another simple program that requires no installation at all.
Using these WiFi tips, you can easily improve your wireless internet access speed, or solve problems with your wireless internet connection. Good luck!
How to Optimize Your Wireless Network Channel


0 Comment:
Post a Comment